On my Facebook page I promised to write a blog post dedicated to cards of a new, at least to me, type. So, here we go.
They are so-called "tent cards", I first saw a card like this here (try to load the page in a translator, the author tells how she came out with the idea). Some time ago I created two greeting cards of this kind, too, and absolutely loved them. Naturally, quilling is one of their main elements. The first of my cards, in shades of light-brown and pink, is actually my very first (and hopefully successful) attempt at tent cards.
Inside the card, in a window I placed a flower pot suspended from a string. The pot was made using the basic techniques of three-dimensional quilling. The flowers are mostly tiny folded roses and fringed flowers. To decorated the card around the window I used the Martha Stewart Crafts Punch Around the Page, French Scroll Punch Set, which is a great product in my opinion.
On the reverse side of the card I added a pocket and prepared a tag to put into it. The tag is intended to write greetings or wishes on. This card was made for a friend, and you can imagine how happy I was to hear that she liked it very much. Size of the card is about 3 1/2 x 4 3/4" (9 x 12 cm).
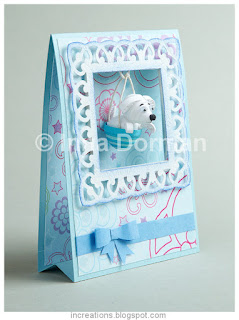
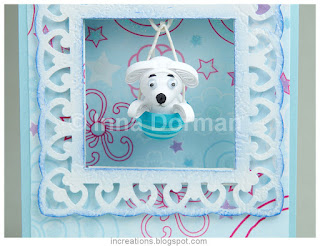
As I already mentioned, my family are the best admirers of my work. I am sure the same is true for most artists, artisans and crafty people. That is why when my youngest daughter saw the card I made for the friend, she immediately asked me to create another one for her. And I must say that the idea of this second card was entirely hers. She decided on the colors of the card, selected a light blue scrapbooking paper for it, and requested me to quill a puppy in a basket instead of the flowerpot :) Well, my mission was to figure out how to make a puppy with quilling, and I cannot say that I did not like the assignment.
Both the basket and the puppy were made of 1/8"-wide (3 mm) paper strips (using the same three-dimensional quilling techniques). The white puppy has a cute black nose and googly eyes, which I think give a somewhat sad expression to its face. The window in this card is little smaller than in the brown one, and I also added a paper ribbon with a bow in the lower part of it. Size of this card is the same as of the first one. Needless to say that my daughter loves the card a lot and keeps it on her desk all the time.
By the way, the fact that tent cards can be enjoyed free standing is probably their most important feature. They also have a very special look, of course, and present almost endless possibilities for excuisite and creative gifts. If you are interested in adding cards of this type to your "arsenal", here is a good tent card tutorial. In addition, I invite you to visit my Etsy shop. There you can buy one of my latest quilled creations (including my latest greeting cards), or find ideas that I hope will inspire you to create unique designs of your own.


33 comments:
Очень интересно и красиво
Wowwwwwwww....I used to visit your etsy shop for these beautiful tent cards often...and you never ever fail to amaze me...Inna
All tent cards are delightful, Inna!!!!
Wow..These are mind-blowing Inna..
I love it!!!Thank so much for sharing.
very nice,
gives me ideas. thanks for the link of the tutorial.
Красивые очень! Приятно видеть, что моя идея живет!
Инна, замечательные открытки! Песик такой милашка, удивительная идея =)
wow! I am so enthusiastic!
brilliant and beautiful colors! Greetings Baukje
Love this card style! what a great idea!
I have seen tent cards before, but never thought to put 3D quilling in them. Your puppy is super adorable!
wow, this is splendid! i love the hanging flower pot! cool idea.
I loved it!
very nice:-)
There are absolutely lovely. U inspire me all and your work is so perfect. This last type of cards are so special and different then everything I've seen before. U have all my admiration.
Thank you so much for sharing the tutorial, Inna! It's always a pleasure to visit your blog, so inspiring!
I love how the little dog turned out!
Happy Quilling!
Manuela
So beautiful cards Inna, i love them! Your ideas are always originals!Thanks for sharing with us your experience and knowledge. For me were always priceless! Big hug from Romania!
Superb !!a delight!
very nice, love it!!!
Paula
16Beautiful cards and 3D creations! Thank you!
beautiful and creative!!!
way too cool! thank you for sharing your projects. I learn so much (if I just could stop browsing and work a bit..) thank you also for sharing the links.
Your card is outstanding!
Wow.. your quilling is outstanding Inna.. Where you find an idea to make such beautiful craft? please visit my quilling site too.. here it is www.doddolide.blogspot.com
Very inventive idea for paper quilling! Thanks for sharing.
very pretty!!!
Thanks everyone very much!
Wow Inna these r beautiful..
Nuidhi
http://creativecraftingwithnidhi.blogspot.in/
Absolutely Awesome, I just went and checked out your Etsy shop as well - love the cardinal one, fabulous idea.
beautiful! great! i love it!
How did you manage to fix the pot to the top of the card :)
beautiful creation... I learnt quilling after visiting your blog and made many quilling crafts inspired from your work. I have also started craft blog
swapnascraft.blogspot.com
Hi - So pretty and unusual - HOWEVER Please could you tell us how did you make the TENT CARD itself ?
How do you make the bottom fold and where does it join up etc?
Sue
Thank you, Sue, please READ the post, there is a link to a good tutorial.
Post a Comment