February 21, 2008

Wall hanging with paper butterflies

Mobile/hanging with butterflies

Children will like this mobile with butterflies, although it's very simple and easy to make. You'll need glue, a piece of card stock, a relatively heavy bead (of wood, glass or plastic), a string or thread, and pictures of butterflies. If you're arty, you can draw the butterflies, otherwise cut them out of an old magazine, for example. Butterflies are a popular element of advertisements, so you shouldn't have a problem finding a suitable image.

  1. Cut each butterfly out.
  2. Trace the cut-outs onto the card stock and cut this out as well.
  3. Glue the two parts of each butterfly together, when the thread or string goes between them in the middle.
  4. Tie the bead at the bottom end of the string.

That's it, now you can use the butterflies as a mobile, wall hanging or another decoration.

February 19, 2008

Papier-mache picture frame with seashells

Picture frame: papier-mache with seashells

Such an easy-to-make picture frame can make a fun craft project for you and your kids. First, you will need to prepare paper pulp, a recipe for it can be found here, for instance. You'll need also paints, an adhesive, a piece of cardboard, and decorations, seashells in our case. Measure the picture you want to frame and add the width of the border (approx. 1 1/8" or 3.5cm) at each side. Use these dimensions to cut a rectangle out of the cardboard. Form a paper pulp border over the cardboard around the picture, then press the seashells into the border. Put the frame on a flat surface and press it down with a flat and heavy object, a pile of books wrapped in a plastic bag will do. Leave to dry for a few days. When the frame is ready, color it and glue in the picture. We've chosen to paint it yellow to resemble the sand of a summer beach.

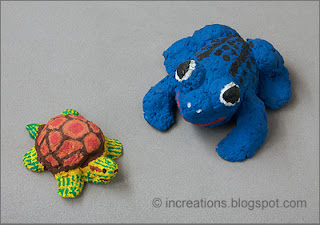
Turtle and frog, pulp papier-mache

Not only the summer themed picture frame can be made of papier-mache. Paper pulp is a pretty good modeling material, cheap, available, and easy to paint on. It can be used in a variety of craft projects, making cute animals like these frog and turtle is just one example. Paper pulp papier-mache toys are colorful and lightweight. When you paint on them, you're actually painting on paper, so almost any sort of paint can be used.

Papier-mache Pinocchio mask

Pinocchio Mask

To make this papier mache Pinocchio mask, we used a polystyrene head as a mould for paper layers. Luckily for us, we've got one of just the right size to fit a three years old.

Usually we build up two layers of small pieces of paper with water, then about three layers with dilute glue solution. Let dry between every 2-3 layers. It's better to use fine paper for the top layer to get smoother surface.

After building the mask and letting it dry, we attached a long paper nose and covered everything with another layer of paper. Cut through eyes and mouth and glued small pieces of paper over their edges. Then painted the mask and glued some crinkled paper shavings for hair.

For the nose, we built a mould of modelling dough and then used the same papier mache technique.

About this technique: Layered papier mache.

Collage: Fishie with paper punch scales

Fish with paper punch scales

We try various materials and techniques for our collages. The scales of this fish are made of waste paper circles from a paper punch. We used colored construction paper and also pages of a colorful magazine we were going to throw away. The fins, head and tail are simple cut-outs. First, we glued the large elements onto the base, then spread glue over the body and sprinkled the scales. Even very small children can do this.

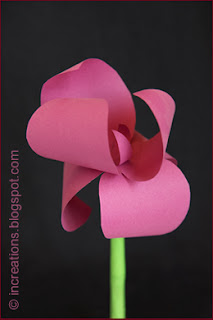
Make a paper craft iris flower

Iris Flower

Cut out two purple trefoils of the same size, make a hole in the centre of one of them for a stem. Roll up a green stem, make small cuts on it's upper end and fold them outwards (for gluing). Insert the stem into the hole and fix it with glue. Curl down trefoil's petals using a pencil. Glue the other trefoil onto the first one, placing its petals so that they are rotated 60 degrees to the underlying ones. Curl them up. Then cut out a smaller trefoil with narrow petals, curl its petals and glue it into the flower, keeping at an angle of 60 degrees to the previous one.

Iris Flower Diagram

Papier-mache penguin made using a water bottle

Penguin

I found this idea at KinderArt, which is a wonderful resource for craft ideas and activities for kids.

Our penguin is slightly different from the KinderArt's one. We used a plastic bottle and covered it with small pieces of paper and glue (about this technique). You may pour some sand into the bottle for stability. Then we crumpled a paper ball for penguin's head and glued it onto the bottle neck, covered the whole thing with another layer of paper mache. For the beak and tail we rolled up two small paper cones. Then cut out and attached feet and wings. After letting the penguin dry, painted him and glued eyes.

February 17, 2008

Cereals landscape collage

Cereal Landscape

We used mung beans, semolina, oatmeal, buckwheat etc. to create this picture, like many others. Outline picture elements, spread glue and let your child sprinkle over the cereals.

February 16, 2008

Glossy magazine paper beads

Paper necklace

You'll need a glossy magazine (one you don't need any more). Pick a page in colors that match your desired necklace. Ad pages are very good for this purpose. Cut page long narrow triangles, the short side about 1.5 cm (0.6 inch). You'll make a bead out of each of the triangles. Starting from the short side of a triangle, roll it tightly around a thin stick (a knitting needle, for example), then glue down the tip. Take the finished bead off the stick and thread it onto a string. You might want also to pierce a hole across the bead and thread it that way. Try also making beads out of a black-and-white text page, you'll get a nice letter pattern.

Making paper beads

February 13, 2008

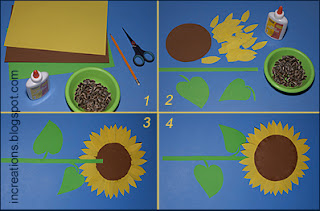
Sunflower collage

Paper Sunflower

This sunflower is very easy to make. I found this project at KinderArt.

  1. Take brown, yellow and green paper, sunflower seeds, scissors and glue.
  2. Cut out a brown circle, yellow petals and green stem and leaves.
  3. Glue the petals and stem onto the circle.
  4. Turn the sunflower over and glue seeds onto it.

The trick for me was to find nice sunflower seeds. No need to say, children love both the process and the result.

Paper Sunflower Process

February 10, 2008

Papercraft mouse finger puppet

Mouse Finger Puppet

These finger puppets are very easy to make. They are also so cute, that kids just love them. All you need is a small piece of paper, scissors, glue and colour pencils.

Cut out a quadrant (see the diagram below), roll and glue a small cone. Then cut out ears, a tail and whiskers. When cutting the whiskers, leave a narrow gap in the middle for gluing. Put everything together, then paint eyes and nose. And don't forget to curl up the whiskers!

Mouse Finger Puppet Diagram

February 9, 2008

Handmade hamsa wall hangings

Hamsa

Making hamsas (see also here) can be real fun for you and your kids. You might also give a home-made hamsa as a gift.

First, we prepare a sketch of how the hamsa will look like, then we draw and cut out a paper template. The template is used then to cut out the clay base. Any other modelling material works as well, of course. The process is described in my Hanukkiyah post. Usually we decorate using beads and decoration stones, or just paint.

Hamsa

February 7, 2008

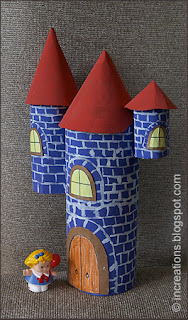
Cardboard toy castle

Cardboard Castle

For this castle you will need two cardboard cereal boxes. First, cut three rectangles of different sizes out of the first box. Glue the short edges of the rectangles and make three cylindrical towers. Take the second box and cut three circles out of it. Make one radial cut on each circle, glue one side of the cut and make three cone-shaped roofs. Then make small cuts along the top edges of the towers and fold them outwards, glue them and attach the roofs on top of the towers. Paint the walls, roofs, windows and doors. After dried up, paint bricks.

February 4, 2008

Easy clay animals

Clay turtle and mouse

Children love animals. Probably the easiest animal craft to make is using a modeling material. This can be a paper pulp papier-mache, salt dough, clay, or polymer clay. No special tools are needed, a wooden toothpick or twig will be enough. Start with an animal that is easy to mold. Choose simple, clear shapes and avoid creating protruding parts. Actually, lying animals like the turtle and mouse on the photo are good to start with. You may be using just natural colors of the material, like the earthly, ocher colors of the turtle and mouse above; or coloring the sculpture, like this cute mouse below.

Colored clay mouse

First, try showing the kids how you make different elements — the body, ears, paws, etc., put them together, and decorate them. Then let your little ones help you by rolling the material, or molding large parts of the sculpture. After they got the idea, let them do their own projects.

February 2, 2008

Peacock Hanukkah Menorah

Peacock Hanukkah Menorah

One of our favourite modeling materials is "Keramikal". It’s pretty soft, nice and can be fired in a regular kitchen oven. We used it to make our Hanukiyot (Hanukkah Menorah's) this year. How? First, cut out a paper template. Then roll out the material on a flat surface covered with fabric, approximately the size of the template. After that, trace the template around, cut out the base and mark the centers of the holes. Use a bottle cap of a suitable size to cut the holes and utilize the cuttings as the base for candle holders.

Hanukkah Menorah

When done with the modeling, press in metal holders into the clay and decorate the lamp with beads. Finally, gently bent up its back and prop it against a vertical surface, a box, for example. Leave to dry for a couple of days. When the Hanukkah Menorah is dry, fire it and decorate using a paint of any type.