Showing posts with label papier mache. Show all posts

October 26, 2008

Make a papier-mache cow using an empty water bottle and toilet paper rolls

Paper-mache cow

Finally we've finished this papier-mache cow project. It took us looooong two months, because either the parents — us — didn't have time for it, or the kids wasn't in the right mood. Anyway, I like the idea of using plastic bottles for paper-mache, which I learned from (again) the blog of Tatyana Dubinsky. We already used it for our paper-mache airplane, and now it's a cow. Our cow is a "classical style", black and white one. I asked my kids if they would like a brightly coloured or a "real" cow. They've chosen the "real" option. I think in their age they don't care about fanciness :) So, if you're still interested...

August 16, 2008

Papier-mache doll made using a plastic bottle

Face

Inspired by amazing papier-mache dolls by Tatyana Dubinsky and her papier-mache tutorials, we made this doll. The fact that even my son enjoys playing with it speaks for itself :). For those who'd like to learn more — a detailed story with illustrations.

June 19, 2008

How to make a papier-mache lion piñata

Lion Piñata

Piñata is a hollow toy filled with small gifts (sweets, toys etc.). A piñata is made usually for a celebration, it hangs from the ceiling and is to be broken with a stick by a blindfolded child (if found). We made our lion piñata for daughter's birthday, but she didn't have enough strength and courage to brake it herself (it's her first piñata).

May 17, 2008

Make a papier-mache airplane using a water bottle

Aircraft out of paper-mache (right side)

Hurray! Finally we've finished this papier-mache aircraft made of a plastic bottle after Tatyana Dubinsky's "Goldfish" (in Russian). The process was taken pictures of for those who're interested.

May 9, 2008

Blue papier-mache bird

Papier Mache Bird

I found the idea of such a birdie on the wonderful Tatyana Dubinsky's blog (in Russian): "Primitive papier-mache". Used a small plastic bottle as a mould, crumpled a paper ball — the head — and attached it, made a triangle cardboard beak. Attached a paper cone at the rear to be used for tail feathers later. Covered with three layers of papier-mache (small pieces of white paper with glue), attached feathers. Finished by painting and gluing wiggly eyes.

February 19, 2008

Papier-mache picture frame with seashells

Picture frame: papier-mache with seashells

Such an easy-to-make picture frame can make a fun craft project for you and your kids. First, you will need to prepare paper pulp, a recipe for it can be found here, for instance. You'll need also paints, an adhesive, a piece of cardboard, and decorations, seashells in our case. Measure the picture you want to frame and add the width of the border (approx. 1 1/8" or 3.5cm) at each side. Use these dimensions to cut a rectangle out of the cardboard. Form a paper pulp border over the cardboard around the picture, then press the seashells into the border. Put the frame on a flat surface and press it down with a flat and heavy object, a pile of books wrapped in a plastic bag will do. Leave to dry for a few days. When the frame is ready, color it and glue in the picture. We've chosen to paint it yellow to resemble the sand of a summer beach.

Turtle and frog, pulp papier-mache

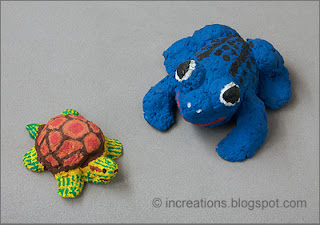
Not only the summer themed picture frame can be made of papier-mache. Paper pulp is a pretty good modeling material, cheap, available, and easy to paint on. It can be used in a variety of craft projects, making cute animals like these frog and turtle is just one example. Paper pulp papier-mache toys are colorful and lightweight. When you paint on them, you're actually painting on paper, so almost any sort of paint can be used.

Papier-mache Pinocchio mask

Pinocchio Mask

To make this papier mache Pinocchio mask, we used a polystyrene head as a mould for paper layers. Luckily for us, we've got one of just the right size to fit a three years old.

Usually we build up two layers of small pieces of paper with water, then about three layers with dilute glue solution. Let dry between every 2-3 layers. It's better to use fine paper for the top layer to get smoother surface.

After building the mask and letting it dry, we attached a long paper nose and covered everything with another layer of paper. Cut through eyes and mouth and glued small pieces of paper over their edges. Then painted the mask and glued some crinkled paper shavings for hair.

For the nose, we built a mould of modelling dough and then used the same papier mache technique.

About this technique: Layered papier mache.

Papier-mache penguin made using a water bottle

Penguin

I found this idea at KinderArt, which is a wonderful resource for craft ideas and activities for kids.

Our penguin is slightly different from the KinderArt's one. We used a plastic bottle and covered it with small pieces of paper and glue (about this technique). You may pour some sand into the bottle for stability. Then we crumpled a paper ball for penguin's head and glued it onto the bottle neck, covered the whole thing with another layer of paper mache. For the beak and tail we rolled up two small paper cones. Then cut out and attached feet and wings. After letting the penguin dry, painted him and glued eyes.