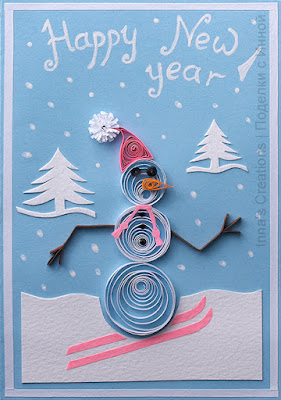
Happy New Year!
May this year be a year of peace, love, health, joy and happiness for you and your families!

This is the last Hanukkah-themed project this year. These magnets are friends of the magnets with Hanukkah Menorah I made before. All the magnets have been handed out as gifts to their new owners' pleasure :)
And I want to wish a Happy Hanukkah to all those who celebrate!

Hanukkah is one of the most joyful Jewish holidays, Israeli Children especially love it. They have fun making Hanukkah Menorahs, lighting candles, playing dreidel, eating latkes and sufganiyot (fruit-filled doughnuts) and receiving gifts, of course. We made this hanukkiah with my older daughter, even though quilling isn't the easiest craft for a 5-year old.

It was designed in the shape of daffodil flowers. Each light is made of two paper strips of different colours. My daughter helped me gluing them together. She also rolled coils, which I later turned into bowls for the candle holders. So, here's the result of our collaboration :)

This is another cake from my archive. I found the idea for this cake in Quick & Easy Party Cakes for Kids: Over 130 Delicious Recipes, although my way of making it is different.

I already suggested some ideas for making a Hanukkah Menorah. Those all were old ones, but this hanukiah with houses was made this year. To be honest, we had lots of new wonderful hanukiah ideas, but most of them have been rejected because of technical difficulties: we just didn't know how to make them :( As a result, they remained on paper in the form of notes and sketches, and we ended up building one we had enough skills for. Nevertheless, it turned out quite cute, and we're really satisfied with it.

The preparations for Hanukkah aren't over: I'm currently making simple greeting cards for friends and family. Quilled, naturally :) This version features the Hanukkah Menorah, but I'm also planning to make some with dreidels, too. I glue magnetic strips (cut out of business magnets) on their reverse side, so that such cards can also be used as refrigerator magnets. Their width is about 10-11 cm (4 inch). You can see more cards of this style below:

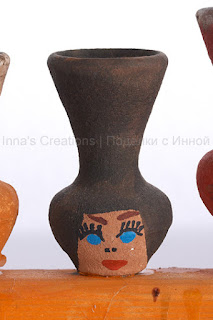
Let me tell you an almost detective story :) Hanukkah was already coming, but we still didn't have a Hanukiah for our older daughter to take to the kindergarten. So, when it became impossible to postpone making one any more, I went to the crafts store and bought 9 small clay jugs. Then I had a wooden plank painted orange with watercolours. In its middle I glued a small wooden stand for the Shamash, then glued the jugs onto the plank. To decorate the Hanukiah I painted a girl's face on each jug. Next morning the child went to the kindergarten with her new Hanukiah. Happy end :)
More Hanukiah ideas:
This yellow bird is my new three-dimensional quilled work. When I was skimming through my new book on 3D quilling — Three-Dimensional Quilling: Making Characters — for the first time, two ideas popped into my head right away: a fish and a birdie.

Our preparations for Hanukkah are in full swing. Here's another idea for Hanukkah Menorah, this time from cardboard, paper and toilet paper rolls.
For its base I cut out a strip of thick cardboard and wrapped it in a piece of pretty wrapping paper. Then I glued a small cardboard square, also wrapped in paper, into the middle for the shamash. I used Ferrero Rocher sweets wrappers for the candle holders :) The candles are made out of toilet paper tubes. I cut the tubes lengthwise, rolled tighter and stapled them to make them thinner, attached the candles to the base.
You can make such a Hanukiah almost in no time, if you engage all of your family members. My children helped me cutting, gluing and painting and we had ours finished in just half an hour :)
Check out also this version. You might like it better. It uses toilet paper tubes and aluminium muffin cups.

Winter in Israel means a lot of rain. To make a rainy day fun despite the bad weather, we made this pet cloud out of paper. We painted a cloud on an A3 sheet and cut it out. Then we cut out raindrops and glued them to pieces of thread, attached those pieces to the cloud and hung the cloud in the doorway. I recommend using aluminium foil or glitter paint for raindrops to make them sparkle as the wind moves them. You may use aluminium foil for the lightning too, or paint it by blowing through a drinking straw like we did.

We made this robot from various junk items: boxes, lids and bottle caps of different shape and size. All you need is to unfold the boxes, then fold them inside out and glue. Afterwards assemble the robot, paint it and attach bottle caps for eyes, ears, knobs and buttons. We also used drinking straws for the mouth. You can play with the robot or use it as a wall decoration, and even give it a hug if it's big enough :)
By the way, you must see the robots Gail from "That artist woman" made with her kids!
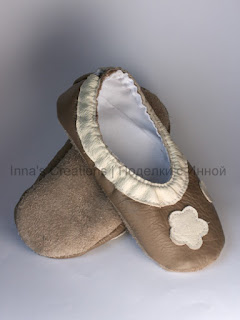
I've sewn these simple slippers for my daughter's dance classes. For this project I bought scrap leather, although an old bag or jacket can be used. I also needed cotton fabric for the lining and an elastic band to thread around the ankle. I followed the instructions at Sew-ing.com (I don't read Japanese, but could figure out from the pictures).

At last we had an opportunity to visit the Utopia park. Frankly speaking, we didn't expect too much, in spite of the numerous positive feedbacks we've read. To our surprise, we had a lot of fun, took almost 250 pictures, and I even got the inspiration for a new quilling project.

Very often the most simple ideas are also the most successful ones. Try making stencils for your kids and see. Stencils are easy to make even for those who aren't very crafty, they don't take up space at all, and are easy to use. At the same time they let you explore your creativity: you can combine a number of stencils, make prints of different colour and density, and so on. You can also make brand new stencils whenever you wish!
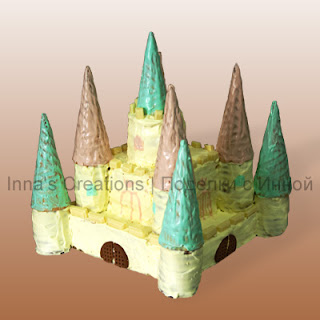
Another idea for decorating a birthday cake. Unfortunately, the only photo I have is old and bad. I tried to fix it in Photoshop and this is what I could achieve given my Photoshop skills.
The bottom part is a big square with a smaller square on top of it. There is a big tower on top of that. All these parts are cut out of sponge cakes. Stack round cookies sandwiched with vanilla cream for the four towers at the corners. Ice-cream cones make perfect roofs. Decorate the cake with pieces of white chocolate and cookies. The castle cake is very high, so make sure you have enough space in the fridge :)

Finally we've finished this papier-mache cow project. It took us looooong two months, because either the parents — us — didn't have time for it, or the kids wasn't in the right mood. Anyway, I like the idea of using plastic bottles for paper-mache, which I learned from (again) the blog of Tatyana Dubinsky. We already used it for our paper-mache airplane, and now it's a cow. Our cow is a "classical style", black and white one. I asked my kids if they would like a brightly coloured or a "real" cow. They've chosen the "real" option. I think in their age they don't care about fanciness :) So, if you're still interested...

There are almost 100 posts in my blog, and I thought it's time for it to have its own "face". 5 pages of sketches, about 80 photos and a couple of Photoshop files — and here you go. It's far from perfect, but unfortunately I don't know how to get exactly what I wanted :( Making the quilled part of the header — the crawling baby — turned out to be the easiest task. I made a pencil sketch, rolled the elements, glued them together and secured them in place until the glue is dry. I put an old mouse pad underneath to stick the pins into. I had also to put a piece of cardboard under the baby's arm to support it.
We also finished a cute paper-mache toy. I'll show it in a next post in a few days, along with the instructions :)

How to make toy turtles out of bottle caps: take a plastic bottle cap and a sheet of construction paper. Put the cap onto the paper and trace it around. That will be the turtle's body. Add a head, paws and tail. Cut them out, then just glue the cap onto the body. That's it. Try also making a few turtles of different sizes and stacking them on top of each other.

I keep exploring three-dimensional quilling, as you can see. When making this red haired fairy I tried to make it differently from many other quilled fairies (like in Three-Dimensional Quilling: Making Characters). First, her wings are shorter. I paid a price, though. Short wings do not support her, so I had to glue her onto a matchbox to keep her upright.
I also made her a magic wand out of a paper rectangle and a bead. Folded a tiny rose and put it into the fairy's hair. For the face I cut out paper eyelashes and mouth, and painted the eyes using felt-tip pens.
That's it. She is about 8 cm high, by the way.
My first three-dimensional quilling: Lady in blue.

I found this idea at one of my favourite crafts blogs. Gail of "That artist woman" explains how to make gnomes out of sticks. Each of our family members made a gnome of their own. We used colored paper for hats and shredded paper for beards.

"Shana Tova!" means "A Good Year!". It is a traditional greeting on Rosh Hashanah. I wrote about the greeting cards with paper quilling I made for Rosh Hashanah, but this card you can easily make with kids.

Greeting cards with paper quilling for the Jewish New Year — the third and the last part. Previous parts: Rosh Hashanah cards with quilled pomegranates and greeting cards with quilled apples. Honey and apples to make the new year sweet, pomegranates and fish have several meanings in Judaism. I'm not going to tell you about symbolic foods, I just want to with you "Shana Tova Umetukah" — a good and sweet year!
More Rosh Hashanah greeting cards:

Children love these bracelets made from paper strips. The idea isn't new, I made origami bracelets from candy wrappers when I was a child. I'm writing this tutorial for myself too, because I not always remember how to make these paper bracelets, although one day I had to make 35 of them. Well, let's start...
About a week ago I received the book Three-Dimensional Quilling: Making Characters from Amazon. And couldn't help making my first doll. Nothing special, exactly by the book.
For the dress I used hand-coloured with sparkling watercolour paper. The skirt requires three strips 1 cm wide, the top — two strips, the sleeves — one strip 0.5 cm wide for each sleeve. The rest is made of regular 3 mm strips I cut myself. The hair is made of narrow strips cut along in three, after gluing. That is, you get three hairs 1 mm wide out of a 3 mm strip. And finally, used fibre-tip pens to draw the facial features.
When looking for online resources about crafts, especially my favorite paper quilling, I often stumble upon images copied from my blog, many of them with the text removed, not to mention that no link to their source is given :( What for I've been placing the watermark at the corners, trying to make it as unobtrusive as possible?! I'm aware that nobody can guarantee that my photos will be always attributed to, me once I publish them to the Web, but what about common rules, ethics, and maybe the copyright law, too.
So, copy the images if you like them, but please, link to their source (that's easy, isn't it) and don't remove the text, that's very important to me. If you really need pictures of my artwork without a watermark for some reason, just contact me.

Another two greeting cards for Rosh Hashanah (Jewish New Year) with symbolic foods: pomegranates (on these cards), honey, apples and dates (on the previous ones).

More greeting cards with paper quilling: Rosh Hashana greeting cards continued.
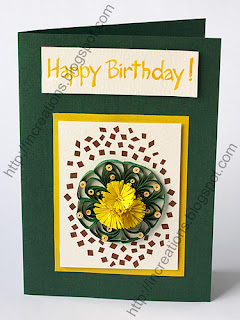
Cacti is one of my dad's hobbies. I thought it very appropriate to use the subject for his birthday card. It's Astrophitum asterias (Sea Urchin Cactus, Sand Dollar Cactus), I found how to make it in Helen Walter's "A Guide to Quilling Flowers".

I've been making cards for Rosh Hashanah (Jewish New Year) for a couple months now. And of course with paper quilling :) Posting two of them. The items and symbolic foods for this holiday are shofar, dates, fish, pomegranates, honey, apples, challah bread.

More Rosh Hashana greeting cards: Shana Tova cards with quilled pomegranates.

It was hard to resist the temptation to sew a rag doll (there are so many fabulous examples out there!). Especially when the younger daughter wants badly a doll she saw in her sister's kindergarten... She loves her new doll, fortunately.
I used fabric scraps, kitchen clothes and yellow yarn for hair. How to make it see this and this articles at eHow, for example. Google can be even better.

If you don't know about the Art Projects for Kids blog, go and visit it now. It's a must! Just look at these cat heads my daughter draw following the instruction in the Laurel Burch Cat Heads post.
