Showing posts with label toys. Show all posts

August 26, 2013

Paper quilling: Miniature squirrel

Do you remember my 3-D quilled family of mice? They have the cone shape in their base, with some traditional 2-D shapes used for other elements. The same technique can be used to make various characters, including animals, fairies, etc. For example, something like this small squirrel I created some time ago.

October 10, 2012

3D Quilled Animals - Lion

Recently I came across my 3D quilled lion tutorial ripped off by a web site from a PDF (along with other tutorials), and shared on Pinterest. Can't help stumbling upon stolen images and tutorials here and there :( Anyways, I would like to remind that the tutorial is available in high resolution, with detailed instructions in English, and absolutely free of charge. It can be downloaded from the page Lion: 3D Quilling Project. Moreover, everybody is welcome to distribute the file or even host it on their website, legally.

Some thoughts for those of you who publish things on the Internet. In the past I released some quality content under a Creative Commons license, hoping to give people an opportunity to use it legally, while also benefiting from this myself a little bit. And here are my observations: for every legal use (if at all), I find tens of illegal ones, that is without even mentioning the source. It looks as though every image without a watermark just asks to be stolen. Sad :(

December 12, 2011

Quilled dragon for kids

Quilled Night Fury

You are probably familiar with this quilled dragon I made with my children on last summer vacation. This is Toothless the Night Fury from "How to Train Your Dragon". My kids like the movie very much, so we decided to create together this lovely character. Quilling strips of black, bright-green and red colors were used for the project, all of them 1/8" wide (3 mm). We also used pieces of black paper for the wings. The wingspan of the dragon is about 4 3/8 inches (or 11 cm). Isn't he cute?

October 11, 2011

Quilled sheep for Agricola board game

Handmade Agricola sheep (quilling)

When a colleague of my husband saw my blog, he asked if I could create miniature sheep figures for him. It turned out that he's an Agricola game fan. For this board game you need sheep among other things. Besides the game itself, its fans value handmade pieces for it. The animals have to be tiny, approximately 3/8" x 3/8" (1 x 1 cm) in size. Most of the Agricola animals found on the Web are made of polymer clay (FIMO, for instance).

January 22, 2011

Quilled Totoro toy

Paper quilled Totoro, front view

If you haven't watched the anime film My Neighbor Totoro, I highly recommend it. This is one of my kids' favorites, so I made a tiny Totoro toy with paper quilling.

December 29, 2010

Quilled baby owl

Quilled baby owl, side view

Dear readers! First off, I would like to wish you a happy New Year! May the upcoming year be full of joy, good health, peace and creativity. I'd like also to apologize for not blogging, and not responding to emails and comments lately - I've been too busy with my classes.

October 13, 2010

Quilled family of mice

Quilled mice, front view

A new baby was born to the family of mice-lovers, our friends I already made a 3D quilled mouse for. First I wanted to quill a traditional baby carriage or cradle for them on this special occasion, but on second thought found a better idea — a family of mice with a newborn baby mouse. Look how this loving couple have their tails interwoven and how tenderly they are holding their baby :) The father looks so proud!

July 15, 2010

3D quilled princess reading a book

Quilled princess with book

Let me introduce to you a new character in my collection of three-dimensional quilled miniatures. This is a princess in a fancy dress. It's hard to call this miniature a masterpiece, but my girls love playing with her, and this is most rewarding to me. The lower part is made up of two layers: the base is a quilled bell (beehive) of 1/8" strips decorated with "eyes" and tight coils; on top of it there's another layer, which consists of wheatear shapes created using 1/16"-wide paper strips. The crown is decorated with tiny rhinestones, as well as the pendant. The book is made of small colored paper sheets, about 3/16 x 3/16 inches each (5 x 5 mm). I decided not to create facial features this time. Height: approx. 3 inches (7.5 cm).

To learn the basics of three-dimensional quilling please download my step-by-step tutorial for making a 3D lion.

November 19, 2009

Make a space rocket toy from toilet paper rolls

Space rocket kids craft

Some time ago I stopped throwing away toilet paper rolls, because they can be used in a variety of craft projects. This toy rocket is another example of such easy and eco-friendly kids crafts.

October 12, 2009

Witch and wizard paper craft

Paper craft witch and wizard

Many of my readers celebrate Halloween, so I thought I'd post something related. Do you like these cute witch and wizard? They can be made out of paper withing a very short time. Actually, you can make any figure following the same principal: create a paper cone, cut out and attach arms and hands, then just decorate and add attributes and accessories. For the wizards it's a magical wizard hat and Turkish shoes, for the witch it's also a broomstick. Got it? Well, I'll try to make some order:

August 30, 2009

Homemade kaleidoscope toy

The kaleidoscope is one of those toys that make me nostalgic for my childhood. Today, just before children go back to school, I'd like to show how to make a homemade kaleidoscope toy. On the photo above you can see samples of what's seen through the kaleidoscope I've built with my kids. Each pattern is enclosed in a black circle because of the way I photographed them. In reality though, you should see continuous patterns throughout the field of view.

July 17, 2009

Make a cardboard castle using discarded boxes and toilet paper rolls

There are many ways to build a castle with children. Once I already made a small cardboard toy castle with my kids, but this time we wanted something more impressive. For our castle we collected cardboard boxes of different size, and toilet paper tubes. Using those building blocks, paint and some colored paper, we created this castle with floors, round towers, windows and a cone-shaped roof.

May 13, 2009

3D quilled mouse toy

Mouse, three-dimensional quilling

I have a lot of new creations to show, but no time to post :( Despite this, I'll try to blog as much as I can. This mouse was made as a gift for friends who like mice of all kinds :) The design is based on the one from "Quilling: Techniques and Inspiration" by Jane Jenkins (this is one of the best books on quilling I've seen so far, by the way). The mouse is about 2cm (7/8 inch) long without the tail, the paws are made from narrow strips (half the regular 1/8'' width). The wheat ear is real, not quilled :)

May 7, 2009

Fox & rabbit quilled miniature

Fox & hare, paper quilling

Some time ago I created a tiny cat and mouse using paper quilling. One of my Russian readers, a remarkable person, Waldorf educator and Waldorf doll artist suggested that they can be used for what she calls "tales on the palm of a hand". The main idea is that such miniatures can be created in the process of telling a tale, or hidden in a hand and then shown, as children watch and listen. The tale must be short and simple, not a classical fairy tale, but a story about familiar, everyday matters. She gives an example of such a tale with the cat and mouse (something similar can be done for these fox and hare):

— Hide the figures in the palm of your hand and begin: "Once upon a time there was a kitty. He was as black as coal. His tail was black, and his ears were black, and his paws. But his eyes were green, like spring buds."

— Open up your hand and show the kitty: "One day he felt very lonely and was looking for a playmate, when suddenly he heard a strange noise".

— Scratch something with your fingers making a noise: "Who's that?!"

— The little mouse shows up (from your hand or pocket), you tell how the kitty chases the mouse, and so on. You can even finish at this point. That would be enough for small kids.

For those interested in making the fox and hare characters with paper quilling, I used simple quilling shapes, made of hand-cut strips. For the eyes the strips are half the width of regular 3mm (1/8 inch) strips.

April 16, 2009

Captain Hook's hook, recycling kids craft

Captain Hook's hook

Do you buy every toy you child wants to play with? Even if you know it won't last long? I don't think so. I'll show you how to make Captain Hook's hook in 5 minutes, if your kids are playing pirates.

  1. You will need a disposable cup, preferably a paper one.
  2. You will need also a piece of cardboard, for example a used box.
  3. Fold the cardboard in two and cut a hook out of it.
  4. Glue the two halves of the hook together, leaving approx. 2 cm (3/4 inch) unglued at its bottom end.
  5. Fold those unglued ends outward, you will glue them to the cup later on.
  6. Wrap the hook in aluminum kitchen foil and attach it to the cup, gluing the flaps you made in the previous step to its bottom.
  7. Make holes in the cup for better ventilation. Let's play now!
  8. You may also paint the cup according to your (i.e. your child's) taste.

March 31, 2009

Homemade Soma cube puzzle

Soma cube puzzle

The Soma cube is a 3D puzzle that consists of 7 pieces of different shapes. These pieces must be assembled into a 3x3x3 cube. There are 240 distinct ways to solve the puzzle. I made a home-made Soma cube puzzle out of small, about 1.5 x 1.5 x 1.5 cm (9/16 x 9/16 x 9/16 inches) colored wooden cubes, like those you can buy at arts and crafts shops. I didn't have to buy them, since we have been using such cubes for a long time — the kids like playing with them. Only 27 cubes in total are needed. I just glued them together with a wood glue, and here we go: now my children can enjoy this amazing puzzle, they solve it or build various 3D shapes out of its pieces: castles, animals, etc.

Soma cube pieces

Some interesting resources about the Soma cube: Soma cube in Wikipedia, Soma cubes, and a lot of stuff on the Soma cube.

February 25, 2009

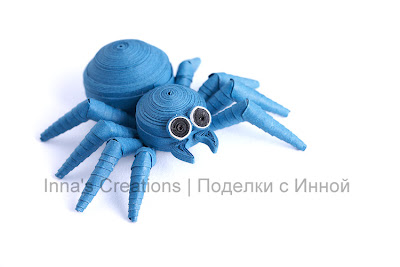
Spooky spider, three-dimensional quilling

Spooky spider (paper quilling)

Don't be afraid of this little spider — he's made out of paper strips :) Maybe he's a relative of our pompom spider. More pictures:

February 23, 2009

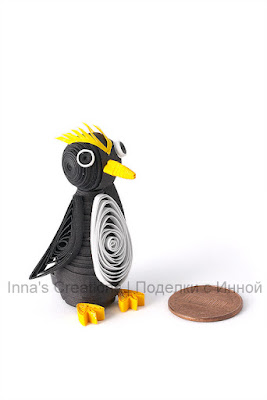
Penguin: 3D quilling miniature

Macaroni penguin (3D quilling)

Along with the traditional, I also enjoy doing three-dimensional quilling very much. Here's my new 3D piece &mdash a penguin. Here's how I made it:

February 22, 2009

Make a toy telescope using toilet paper rolls

Home-made toy telescope

Recently my son got interested in astronomy :) Even though he's only almost four, he enjoys watching documentary movies on astronomy, knows the names of all the planets, what a solar eclipse is and much more... That's why we came up with the idea of making a toy telescope. Here's how you can do this:

February 19, 2009

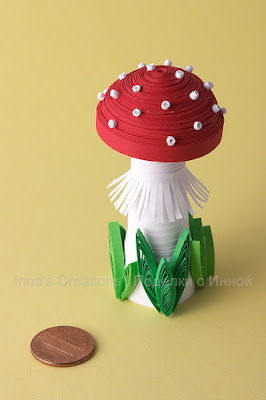
Three-dimensional quilling toadstool

Mushroom. Three-dimensional quilling

Stalk: For the stalk I cut 10 strips about 5 mm (3/16 inch) and 29.7 cm (or 11 inches) long, out of white A4/Letter printer paper. Then with the help of my children I joined these strips into a continuous long strip of about 3 m (10 feet), rolled it on a toothpick, glued the tip and pulled the toothpick out. Then I pressed into the center of the disk with my finger to form a cone shape, and coated it with glue inside.

Cap: For the cap I used about 20 red strips 5 mm (3/16 inch) and 29.7 cm (or 11 inches), as I did for the stalk. We joined them into a long strip, rolled it and then I shaped the roll into a dome shape. Coated with glue inside the shape.

Finishing: Then we attached the cap to the stalk and make a ring from a wide (1 cm or 1/2 inch) and short (5 cm or 2 inches) strip cut to make a fringe. I made a few quilled "eyes" for grass and let the kids attach them to the mushroom's stalk. The white dots were the most difficult part; I rolled them using very narrow and short white strips (1 mm or 1/32 inch wide, and 2-3 cm or 1 inch long) and carefully glued to the cap using tweezers.