As you probably know, paper quilling or paper filigree can be used for creating greeting cards, decorating objects and even building three-dimensional sculptures.
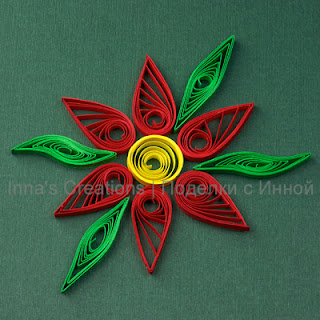
This is a getting started quilling guide, where I'm showing the basics of paper quilling by the example of making a simple flower. The entire process should take about 30 minutes.
There are special tools and papers for quilling, but let's manage with only things everybody has usually at hand:
- sheets of double-sided colored paper (A4 or Letter size)
- wooden toothpicks/cocktail sticks, or a slotted tool
- metal ruler
- crafts knife
- pencil
- white craft glue (PVA)
- template with circles
- cutting mat or board
- nice colored or patterned paper for the base

1. Make marks of 3 mm (1/8 inch) along the short edges of a paper sheet. Always start measuring from the same edge, since the last mark may turn out shorter, than needed.

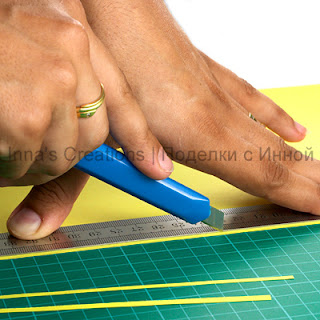
2. Cut strips using the craft knife and ruler. Try cutting a few sheets at a time: clamp them with office clips or clothes pegs. Press the ruler thoroughly and make sure the knife is sharp. Cut with one movement, applying strong pressure onto the knife and being careful not to cut your fingers (and table). You get colour paper strips 3 mm (1/8 inch) wide and approximately 30 cm (11 inches) long.

3. For a petal take a strip and roll it tightly around a toothpick. You might want to make a slit in the toothpick, it holds the end of a strip and makes the start easier.

4. Gently pull the roll off the toothpick and put in into the circles template. Choose a circle of 1.5-2 cm (5/8 to 3/4 inch) in diameter. Release it, the paper unrolls up to the size of the circle. Don't hold the roll for a long time, it won't unroll otherwise.

5. Glue the end of the strip and let dry.

6. Take the coil out and pinch it on one side. You've just got one of the basic quilling shapes (see at the end of this article), which is called a "teardrop". There are about 20 basic shapes, but the idea is always the same: roll and pinch.

7. Make 5 more "teardrops" in the same manner — the other petals of the flower.

8. And now let's make a leaf. Repeat steps 3 through 5, then take out the coil and pinch two opposite ends simultaneously. This shape is called an "eye".


9. We'll use another shape for the second leaf for a change. This shape is called, strangely enough, a "leaf". Do everything as if you were making an "eye", but after pinching shift the hands in opposite directions without releasing the shape.


10. Now making the center of the flower is easy: just roll a coil and leave it as is. To make it smaller use a smaller circle in the template (about 1 cm or 3/8 inch). It's called a "loose coil", by the way.
11. Arrange the elements, mark their position on the base, then apply a thin layer of glue to the bottom of the shapes and attach them to the base.
Some basic quilling shapes for reference:

56 comments:
You are welcome!
I wasn't sure if anybody needs this :), there are so many quilling sites! Glad you found it useful.
i love your work!
Thank you :)
Wow. I thank you so much. I have been looking for easy to understand instructions.
You are welcome! Glad you found it easy to understand :)
Инна! Вы просто гений! Смотреть на ваши работы - одно удовольствие! Спасибо!
Влада
Большое спасибо :)
wow this a cool blog and mam ur so good with ur handworks and tutorials.thanks a bunch.
Thanks a lot, webbie!
It is first time I see such a craft, it is very beautiful!
Thank you, Katia!
Hi,
Your work is wonderful.....
but how do you manage to glue it to the background sheet after the entire quilling process...
thanks
Satia, you need to apply a small amount of glue over the edge that will be put onto the base. Check out this great article by Charlotte Canup: How To Glue Your Quilling to a Background Surface, I'm sure you'll find it very useful.
I love quilling but in my country, it's not popular so I can't buy tools. Yours tips are useful for me. Thank you very much!
You are welcome, Trang DO! Quilling isn't popular in my country either :)
Inna,
Thank you for the tutorial. Will try it soonest, :)
You are welcome, khalmuz :)
this is really pretty and helpful.. thank you so much.. but sometimes i wonder how u can make such complex designs that looks impossible to me.. its just like wow! you're awesome.. =)
thank you so much for this ^^ i'm planning to decorate our Christmas tree using this art. really happy i got to see this ^^ keep it up!
GOD bless!
Maybelle, a lu, thank you very much!
The store where I have been purchasing my quilling paper has recently stopped carrying it so I have decided to make my own. I am not sure what paper to use, though. What weight is yours?
thanks!
what kind of paper is it i can't understand for making the strips!!
i tried many thin papers but they did not work for me!!
CAN YOU TELL ME SOME GOOD AND SPECIFIC TYPE OF PAPER!!
@Anonymous
You can find information about paper I use here: Cutting paper strips for quilling
Inna, your work is just beautiful!!! Do you recommend quilling for people with arthritis? I thought my mom might really enjoy this craft, bu she's worried it might cause her arthritis to flare up.
I interest with quilling paper and i hope can try it....
inna. it's beautiful. thank's a lot.
Thanks everyone very much!
@How to Macrame
Unfortinately, I can tell nothing regarding quilling for people with arthritis. Sorry
hi im ila and i love your work its awesome we use this as a project xDD
hi! it's so useful for a beginner like me.
thank you!
my schoolage kids are going to love this project...
thank you
Great job~ Very nice and I like it so much~ =D
thank you sooo much inna..
only last night i came acros ur blog..t ws lovlyyy...u rely giftd..i lovd each nd evrythng dat u hav done...
inna dear,cud u pls teach me how to make squares and triangles..i have tried bt i am nt getting it!!!
am just a starter...
can u be my guide?? plss...
Thanks a lot for such a fantastic ideas.....now i will made my own quilling creations...thnk u & please give some more ideas...
Thanks a lot . . Its very helpful and pont to point tut for new bees :)
Sai
Thanks everyone very much!
HiYour basic lessons on quilling is so It'so clear and easy to follow.It's got me so excited I'm going to try this project with tthe kids at school. Thank You.
thanx Inna.. i m a teacher n on every Saturday i teach my kids sumthng new. i really appreciate ur work as it would help me in teachng my kids ths fantastic art.
I have had a quilling kit for ages but just have not got around to having a go this is the first time I have checked out a tut you have made it so easy to understand so out comes the kit
Thank You
Steff
thanks..this tutorial looks easy..i will try next time ^.^
Thanks for the wonderful tutorial. It is very easy to learn for beginers like me.
Thanks everyone very much! I'm glad you like my tutorials.
this website is really worth watching and every beginner must watch this site thanks inna for ur wonderful work
Thank you, Sunitha!
Hi Inna,
Thanks for such a helpful tutorial! Just tried some stuff and it feels good :)
I find it very useful, especially that it has taken my fancy and I wasnt aware that there's this form of art and can be a hobby too :)
hi anna,
its usefull since i'm doing it for the first time..
thanks for sharing us the tips.
may i know what type of paper are suitable and easier to do quilling, since its unasy to find the craft paper at malaysia.
@~EyDa~
Thank you! Please read this post about the paper strips I use: DIY: Cutting paper strips for quilling.
Thk u so mch Inna! i chanced upon ur website while browsing thru http://artplatter.com/2011/12/quilled-birthday-card-shades-of-blue/..even i hav difficulty sourcing the materials for quilling & was so happy to find ur site!love d idea of using a slotted toothpick!n how u've cut paper strips yourself.Where der's a will der's a way! Thk u so much for sharing.
THANKS--it's my first time reading about it.
Your tutorial is easy to follow and the results very pretty. I did quilling years ago but needed a reminder so thank you very much. Your quilling is just so beautiful.
Really easy to understand
Thanks a lot...
Creative and fun .. Just what I wanted to do with my kids .. Thanx a bunch :)
its super easy tutorial...
Lindo!
Merci pour ce tutoriel qui nous a permis de faire :
- une fleur comme la tienne faite par mon amie,
- un papillon faite par moi parce que mes feuilles n'étaient pas suffisamment symétriques.
Je rechercherai un second tutoriel mais voilà un bon début qui nous a bien plu....
Gracias por compartir tus dones, esta hermoso el diseño. Bendiciones.
Post a Comment