Children love these bracelets made from paper strips. The idea isn't new, I made origami bracelets from candy wrappers when I was a child. I'm writing this tutorial for myself too, because I not always remember how to make these paper bracelets, although one day I had to make 35 of them. Well, let's start...
1. You will need coloured paper, a ruler, a pencil, scissors or crafts knife. Cut strips of 3x12 cm. For a child's arm you will need about 18 strips for one bracelet. By the way, you can use smaller strips with ratio 1:4, but you will need more of those, accordingly.

2. Fold a strip along its long axis and then along its short axis.

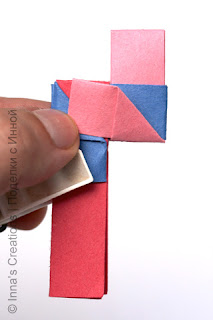
3. Pass a folded strip through another one to form a T. Make one shoulder shorter than the other, it forms a loop. The length of this loop must be a bit longer then the width of a folded strip.

4. Fold the ends of the inner strip outwards and down to form a right angle.

5. Then fold them again so that they aligned with the outer strip.

6. Don't forget to do the same on the other side. Secure both ends with a cloths-peg.

7. Now take another strip and put it through the loop you've made in step 3. You'll get another loop.

8. Fold the ends of this new strip outwards at a right angle...

9. And upwards so that they align with the previous strip.

10. Carefully tuck the ends under the previous strip. Got it? Good!

11. Get another strip through the loop and make another loop.

12. Repeat steps 8 through 10.

13. And so on until the bracelet is long enough.

14. Now pass the ends of the first strip through the last loop.

15. Fold them outwards.

16. Fold them at a right angle, then fold again along the last section.

17. Tuck the ends. Voila! The bracelet is ready.

25 comments:
thanks
It's a good craft to kids
Jessie
You're welcome, Jessie!
Thank you for stopping by.
WOW! I found your site browsing, and had to save it- you have so many amazing ideas! Thank you for sharing.
Thank you so much! I knew a girl in South America who made these from teabags and I've been wanting to learn ever since :)
You're welcome :) I'm glad you found this useful.
I really like this idea.I made bracelets from an old magazine and then I made rings from scrapbook paper. I used pieces of paper 1cm by 4cm for the rings. They turned out really well. Thanks for the idea!
You're welcome! I wish I could see your work :)
When I was a child, the other children made these out of gum wrappers. Both the foil, and the wrapper with the logo of the gum company on it.
They were actually pretty cool bracelets, made of silver foil wrappers, or Wrigglies Chewing gum.
Maybe I'll start saving my gum wrappers and revisit childhood! Thanks for posting how to do this project.
~Garnet
Thank you very much for this... your blog is full of lovely ideas. I made one of these using some leftover pieces of paper and painted in the exact shade of a dress to go to a party... used nail polish as the paint...
Nobody believed it's made of paper :) here's a pic of several I did
http://dinithi.wordpress.com/2010/03/21/paper-bracelets-andor-recycling/
They are lovely! I'm so glad that you found my tutorial useful.
gosh i like it very much..
thx for your amazing post :D
DANG that looks pretty hard 2 make...but thnx 4 the pix. they helped...a LOT(:
nice post
Amazing ...
I like your blog, full amazing ideas.
Thanks for your sharing ideas.
Thanks everyone very much!
wow this is really cool! though i tried it and found that its easier going backwards.
Thanks a lot, you are right :)
I love your little tutorial.
I have posted a pingback to your page on my site as a substitute for real charm bracelets for daughters, nieces, grand daughters etc until they are old enough. I hope you will find it acceptable.
Thanks, Andrea!
This bracelet is very nice! Thank you for your tutorial, it's clear...I just tried to make it. Bye!
thank you so much for this tutorial! I made those with my class & they are happy! Welink to your blog!!!
Thank you! Great!!!
wow! I love this.. these days I spend my time to test hand made things.. this is great...
Do you do duct tape crafts? This is beautiful and fun!!
I made a crown for my son, like that ! Solid and Beautiful !
hi! I also remember when I was a child, my mother was a smoker and her cousin made bags or bracelets using cigarette paper box (it was not solid cardboard box, but made of paper). Or from silver paper also from cig box. I have learned that craft and was doing a lot of stuff, but I forgot! Thank you so much for this :)
Post a Comment