Finally we've finished this papier-mache cow project. It took us looooong two months, because either the parents — us — didn't have time for it, or the kids wasn't in the right mood. Anyway, I like the idea of using plastic bottles for paper-mache, which I learned from (again) the blog of Tatyana Dubinsky. We already used it for our paper-mache airplane, and now it's a cow. Our cow is a "classical style", black and white one. I asked my kids if they would like a brightly coloured or a "real" cow. They've chosen the "real" option. I think in their age they don't care about fanciness :) So, if you're still interested...
You will need:
- Two big plastic bottles, the more rigid the better
- 4 toilet paper tubes
- Shoelace for the tail
- Cocktail straws for the udder
- Wooden toothpicks
- Knife, scissors and awl
- Crafts glue
- Paint and brushes
- And a lot of old newspapers
1. First of all, let's make the tail. Pierce a hole in the bottle's bottom, thread a shoelace through it so that its end reaches the bottleneck and tie a knot there. Then pull the knot inside the bottle.

Tie another knot outside the bottle, as close to the bottle as you can (the second knot isn't shown in the photo). Add a crumpled piece of a newspaper to the outer part of the bottom if needed, secure it using masking tape. Masking tape is used widely in paper-mache, because you can glue paper easily onto it.

The butt rear part of the cow looks like this:

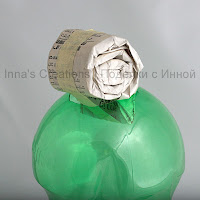
2. I used a bottle with a special shape to make the neck, but your cow can be without a neck at all, that's OK. You have only to make ears and snout. You might also want to add two horns, if you like. For the snout remove the bottle's neck to get a little bit wider opening.

Fold a thick strip of newspaper and roll it into a tight "snail". Leave a short loose end.

Secure the snail with a piece of masking tape, and insert its end into the opening. Attach it with another piece of tape.

3. The ears can be made from another bottle. Leave a small rectangle at one end of each ear when you cut it out, then make two slits in the head and insert the rectangles into the slits.

Using this trick I wanted to create the right shape and rigidness for the paper mache ears.

This is how the head looks like when done.

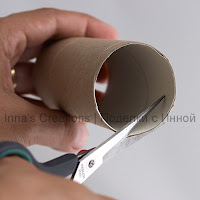
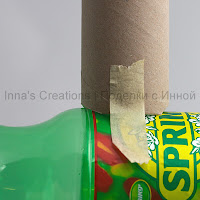
4. Toilet paper tubes wanted to be cow's legs, and we let them.

Make two semicircular cuts one opposite the other at one end of the tube where it will be connected to the bottle.

Attach the tubes using masking-tape.

In this photo you can see a leg with a hoof, the tail and the udder. So, let's make the udder.

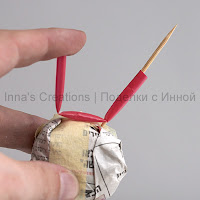
5. We are about to make teats out of drinking straws (pink ones:)

Crumple a small ball from a newspaper, than make a U from a straw and pierce two holes in the places where it bends. Insert toothpicks through these holes and stick them into the paper ball.

Cut the toothpicks if needed. Make another pair of teats and attach the udder to the body. The horizontal part of U will be covered with paper.

6. It's time for papier-mache layers. We had 6 to 7 layers of pieces of newspaper dipped into craft glue mixed with water. Use a stronger glue mixture and white newspaper margins for the upper layers. You might want to check out other Web resources for basic and advanced papier-mache techniques, for example Getting Started with Papier Mache.

7. Decorate your cow, paint or glue a pair of eyes. That's it. Moo-o-o-o!
12 comments:
Oddly enough this is exactly what I need to do for a science project.
Thank you so much!
Great! I'm glad this helps you.
this really helps me
thank you, we named it APRIL for our project
This is awesome. This is exactly what my Daughter and I needed for a school project. Thanks for posting!!
This blog post is a God send, for parents and kids with school projects, LOL. Great inspiration and tips usable for many types of animals.
Thanks a million for sharing this.
Thank you Chrissy! I'm so glad you found it useful.
This was soo much help i needed to make a cow for a school project. Thank you!!! :D:D
Fantastic!! Would it be ok to link to this for a an elementary school lesson?
I had to do a BIG sciene fair project and i wanted to make a paper mache cow, low and behold, first site I found had EVERYTHING I needed! Thanks so much!!!!!
From SchoolGirl
this is very creativ crafted cow :) :) ... i madde ine befir but it was bigger than it wery big .... but yours has a creativ idea with the bottle :)
Years after this post it came across a search for this project. Thank you thank you for the step by step instructions!
Post a Comment