
With 200+ posts and counting, my blog has grown too large, so I'll be posting a series of round-ups in an attempt to make some order. I'll start with quilling (paper filigree) tutorials, and you are invited to suggest a subject for a next one.
 I think I should begin with quilling paper and quilling tools as they are the basic supplies for this wonderful craft. In the article about quilling paper I wrote what kind of colored office (for copying or printing), and construction paper I use to cut strips for quilling, the most popular width is 1/8" (3mm). Don't read it if you can buy paper for quilling easily :) Cutting quilling strips yourself instead of buying them can be a good idea if you can't shop for quilling supplies (in some countries they just don't sell anything for quilling). Another case is when you're new to quilling and just want to try your hand at this craft to make sure you like it, before purchasing good supplies.
 Then, you will need a quilling tool. I don't use needle tools, but only slotted ones. I find them good enough for most of my projects. When I was really new to quilling, I used a wooden toothpick (cocktail stick) with a slit cut into its end. Later I made a few homemade tools from sewing needles. You have to snip the end off the eye using a pair of pliers and stick the needle into a wine cork, felt-tip pen cap, or similar. Here's my homemade quilling tool. Not long ago I've purchased a slotted tool from Quilled Creations, but been still using my good old needles when I need particularly fine coils.
 Now, when you have the basic supplies, you must learn the basic principles of quilling. Following these simple instruction, try rolling coils and shaping them into quilling shapes. I'm not showing any of the advanced techniques in this tutorial, but just things you need to get started with the craft. There are also two easy-to-make quilling flower designs.
 Usually the first design a new quiller creates, features flowers. There are many ways to make beautiful flowers with quilling. Spiral roses is just one of them. This technique is extremely easy, but produces impressing results. I've also published a short video tutorial on YouTube: Three-dimensional paper roses.
 If you have ever wondered how to make quilled spirals (tendrils), then you'll probably find my video tutorial on making spirals for quilling useful. I often use them for tree trunks and branches, and to decorate greeting cards.
 There's another, more complex, method of making folded roses. It requires some effort and practice, but the results are well worth it, since you get naturally looking neat flowers that can be used almost anywhere: quilled cards, embellishments, framed pictures, three-dimensional miniatures, etc.
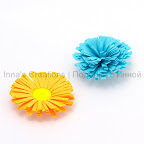 Another popular technique is the fringed or tufted flowers. You may make one with or without center. This quilling technique require some skills, but I'm sure you'll eventually be good at it as well.
 Double fringed flowers is a similar, but a bit more advanced technique. You have to practice it, but the results you get are well worth the effort. There are special tools on the market called fringers for easy fringe cutting, at an angle of 90 or 45 degrees, but I make my fringed flowers using scissors.
 Speaking of tools, you'll need a crimper if you want to try using crimped strips in your quilling designs. I'm describing an easy method of making one in my post about do-it-yourself paper crimpers. Check it out if you can't buy one of those machines for some reason.
 Husking is another advanced quilling technique. You can see it in use in my three-part Quilled poppies step-by-step tutorial. Actually, this project uses a combination of quilling techniques (alternate side looping among them). Take a look, hope you'll find it helpful.
 I have also a few short tutorials. If you're trying to make a quilled apple for a greeting card design, then you'll probably want to read how to quill apples. I've been using this simple pattern for many of my cards. Just to remind, you're free to reproduce any of my original designs, but only for personal, non-profit use. And please, give me credit where it's due.
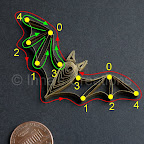 Another pretty simple pattern is for a quilled bat that can be used for Halloween craft designs. There is a detailed diagram, so that you can easily make one. Check it out, it also gives you additional ideas on how to do husking.
 For three-dimensional quilling you can find these downloadable instructions. This is a lion project with step-by-step directions. It includes basic 3D-quilling shapes and techniques, so that you get the idea how three-dimensional quilled miniatures are made. I believe it can give you everything you need to start doing 3D quilling and further developing your skills.
 Finally, there's an article that features 10 quilling tips for children. In this article I've collected some useful information based on my personal observations, and listed some of the simple quilling ideas that can be found on my blog.
There's a lot more to know about quilling, but for a newbie what I've written would be sufficient, I believe. I'd also suggest checking my posts with the label quilling, usually there's an explanation of how I created each of my quilling pieces, even if it isn't accompanied by step-by-step photos. Also, you can find some useful links on quilling in the sidebar. On the other hand, neither my blog, nor the Web in general is a substitute for a good quilling book, of which there are many. I can recommend some of the books that I own, check my Amazon list and my book reviews.
Happy quilling!
27 comments:
Love your creations. They are amazing!
Since you opened the door, I would like to see how you did the spiral stem like the one in your "spiral roses".
Thank you.
Thank you, Helen! The door is always open :)
Do you mean the green paper curls on blue background? I thought it was a common knowledge, but anyway, here's a video that shows two methods for this: How to curl a ribbon. Hope this is what you are looking for.
wonderful - interesting
Thank you!
what a great tutorial! I've made a quilled Christmas card these days and I'll post it in my blog. Your quilling is awesome! Thanks for sharing
הי אינה
זאת שוב אני דבורה רציתי לשאול האם יש סיכוי להסברים בעברית יש לך כאן דברים מדהימים!!! הכי מטריד אותי בעניין הקווילינג זו שאלת הפרופורציות והאורכים של הנייר האם אוכל קבל הסבר איך לשנות את גודל הגילגולים
אם הרבה תודה מראש
תודה דבורה, את תמיד מוזמנת לשאול שאלות כאן או במייל. בעניין הגודל, אני בד''כ משתמשת בכל אורך הרצוע, זאת אומרת בערך 29 ס''מ. אלא אם כן צריך גלגול קטן במיוחד, אז חותכים לפי הצורך. ולהפך, מחברים כמה רצועות כשצריכים גלגול גדול. במקרה של גלגול רגיל, מ-29 ס''מ, שולטים בגודל בעיקר ע''י פתיחת הספירלה כאשר משחררים אותה. אני מקווה שהסברתי טוב, אבל חשוב לנסות כי אין פרופורציות מדויקות
THANK YOU INNA !!!
Hi, you're amazing :-)) I like your tutorials so much und would like to try one of them if i'm allowed ^^
Thanks for sharing your beautiful work with us.
Thank you! You're encouraged to use my tutorials for creating your own pieces :)
nice thoughts....really wonderful.....
Thank you I love all your work. Would like to know how to make the nuphur flower and buds. Have a nice day.
Thanks you so much!
The flowers were made by employing 3D quilling techniques. I can’t write a complete tutorial on this project, so please take a look at my 3D lion, it might help.
My 8 year old is enjoying quilling. I got her a Klutz book with exact measurements for the paper to be cut and how to quill. However, it doesn't have all the things she wants to do. She is looking for a rabbit. Do you know of any kid-friendly pattern books for quilling?
The Klutz's book is the only one I know of on quilling for kids. Try with your daughter to create your own design using the projects in the book as a foundation. Start with a sketch, picking parts of different Klutz's projects as building blocks. For instance, take the head and body from the Pig, the ears from the Lucky Black Cat, etc. Good luck!
Love all your projects. Thanks so much for all the great tips. I just purchased quilling supplies and have not attempted to try anything yet. I was surfing the internet looking for some tips on how to do quilling and came across your blog. I just became a new follower. Take care.
http://lorisartsyobsession.blogspot.com/
Thank you, Lori!
Totally in awe of any one that can quill this artisticlly I am still in the learning phase so always nice to check out a awesome blog
Steff
Hi Inna, I am 9 and we are doing about basic quilling techniques at my school. Your website is amazing, thank you so much!!!!
I love your blog! Beautiful quilling!
Pilar
Hi, There are so many different quilling boards about. I have a couple as i was going to start this new craft but the holes in my boards weren't the same as the instructions i tried to follow. Is it really necessary to have one? The holes in my board seem to smaller for the project i was trying to make as the length of paper hadn't got enough room to relax. I'm getting so confused it's been put in a box and left :( Do you have any advice? Also my coils never look neat inside. each 1 looks so much different to the next. I have big gaps in the middle and lots of paper where I've pinched them into the teardrop shapes.
Hi,
You don't have to use a template, you can just hold a roll with your fingers and let it unwind to the desired size. Then use it as a template for other rolls - hold the coil under a new roll while you let the latter unwind, so that both are of the same size. With practice you won't need that, all your coils will be neat and even. You also don't have to use the full length of a strip, make it shorter if you need. For smaller elements use half or quarter length.
To make coils look nice inside, try to wait a few seconds before opening a coil. The center of the coil will be tighter in this case, but keep in mind that the entire coil will come out smaller. And as banal as it may sound - keep practicing. Hope this helps.
Hi...your all creations are ultimate and awesome.I loved those creations very much..I would like to make cherry blossom.....I would like to knw that the tendrils are of paper and how large are their diameter can that tendrils bear the weight of flowers.may i knw is the quilled flower and all applied with something to b as it is for long time.
lovely creations........
very nice, awesome! thank you for giving this tutorial
i
love creative arts and i liked your tutorials on the quilling. i am
sure to try my hands on it. i am in africa and would very much
appreciate it if you help me get more in creativity so i can help others
too. thank you
Ur r just awesome I am 14 and I wanted to make a card for my best frined and this has helped me very much...thanks for sharing all this
Post a Comment